


 Tuesday, March 22, 2011
 Anu
Anu

You own an Android device or ever wanted to test drive some Android applications even if you don’t have a device? Then this is for you! This time we are going to take you for a fascinating ride on running Android applications in your Ubuntu box!
Step 1 – Installing dependencies
First you need to download a copy of the latest Android SDK(Software Development Kit). You can grab it from here.
Leave your browser to download it and check whether you have Java in your system. Goto System→Administration→Synaptic Package Manager

Now in the Quick Search box, type openjdk . Check whether you have installed openjdk-6-jre

And search for the ia32-libs entry(ONLY if you are on a x64 machine) and double click on it if it’s not installed.
Click on Apply and after the installation process is completed close the Synaptic Package Manager.
Step 2 – Installing Android
Once the Android SDK has finished downloading right-click on it and select Extract Here.. option.

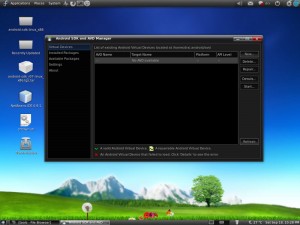
Now enter the extracted folder→Tools and double click the android file and click on Run when a confirmation box appears. You’ll be presented with the Android SDK and AVD Manager interface.
Goto Settings and check whether you have selected Force https://… box. Click the Save & Apply button.

Now go to the Installed Packages section and click the Update All button. A window will appear with all the available updates. Click the Install Accepted button.

Wait for the packages to be downloaded and installed. It will take a while if you have a slow bandwidth. So take a small rest until it finishes, if you don’t mind. Close the update window when it’s done and you will see all the installed SDKs in the Installed Packages section.
Now the fun part. Yeah! Let’s create the virtual device. Go to the Virtual Device section and click the New button. In the new window do the following:
- Assign a name for your virtual device
- Select a target API
- Enter a value for the size of the SD Card
- Add the hardware you wish to have in the emulator
In this scenario our config is as follows:

Now click on Create AVD and you’ll be notified by a pop up which shows your current configuration.

Notification of our current config
Now click the Start button, and the Launch button from the next dialog, and the emulator will start.

Step 3 – Running Applications in Android
In order to run your Android applications you need to upload them into a file sharing service (For further information on these services, please visit (http://pctipsbyanu.blogspot.com/2011/03/top-5-place-to-share-your-files.html ) and access them via your android virtual device.

In our case we decided to install the Android version of DropBox to carry out the test process.


Tada! That’s the end of the journey! We wish you enjoyed the post and share your comments and problems regarding this if you get stuck somewhere. Have a nice day!
Thanks...
 Posted in


1 comments:
request and download APK from Android Market.
Now you can get the APK directly.
it's free http://android-market-apk.blogspot.com
Post a Comment