John the Ripper is a fast password cracker,
currently available for many flavors of Unix, Windows, DOS, BeOS, and
OpenVMS. Its primary purpose is to detect weak Unix passwords. It
supports several crypt(3) password hash types commonly found on Unix
systems, as well as Windows LM hashes. On top of this, many other hash
types are added with contributed patches, and some are added in John the
Ripper Pro.
Here
is a way to reset or hack superuser password, provided you have
physical access to reboot the system and username. All you need to do is
just reboot the system and then follow these instructions.
How to crack things like FTP/SSH/POP3 etc. Well, here is a quick way todo this for all you Windows users out there, provided you have a decentsized password dictionary. I personally use one of about 3.16GB insize, but for this tutorial I'm only going to use a small passwordlist, just so you get the feel of it. First step, download hydra from HERE. If u want to use THC-Hydra thn you must also download Cgywin.
(For Windows users : Download both n install Cgywin n thn compile THC-Hydra from Cgywin)
Download the zip file,extract it, and make sure you see the files below. Ifyou do, that's good. Go to Start - Run - cmd to open the commandprompt. Then change to your hydra folder using the “cd” command.
Forexample my hydra folder was on the desktop, so I did this with "cd desktop" (by default CMD will place you in users home dir).
Nowthat you've done this, it's time to execute Hydra for the first time!Sorry Windows fans, but there is only a GUI for Hydra for Linuxsystems, you you're gonna have to do it the old fashioned way. Neverthought you'd see that happen did ya? Just type “hydra.exe” without quotes, and watch the result
Next, we will do a quick scan to think of some IP's to attack. I would advise Nmap. You can download it from here : NMAP 5.00 or NMAP 5-10 BETA. Install it. Find outyour IP address, so that you know a possible IP range. In the commandprompt sessions, type “ipconfig” and watch the results.
For example, in my case, the range is at least 10.1.1.1-4, but I'll go from 1 to 10just to be safe. Fire up Nmap and do a ping scan “nmap -sP 10.1.1.1-10”to see what hosts are alive, and wait for the results.
Picka host to port scan – I picked 10.1.1.1 because it is a router, and formost people the password is generally pretty simple, if not default.Port scan it using something like “nmap -sS -sV -P 0 -T5 -O 10.1.1.1”and see if it's running any services (click on the “Ports/Hosts” tab atthe end for a simpler view of the services running and their ports)
I'll be attacking the Telnet port because Iknow that it works, because I know you guys think Telnet is the be-alland end-all of hacking, and because the Windows version of THC-Hydraisn't compiled with LIBSSH support (unless you did it yourself), and assuch I can't attack SSH – otherwise I'd be doing that instead. It's somuch better. Head back to your command session, and review the outputfrom Hydra before; it tells you the services it can crack. Afterlooking through it, and realising that Telnet definitely is there, wecan now proceed to attack it with the command “hydra -l admin -Ppasslist.txt 10.1.1.1 telnet”.
Anexplanation of the command: -l admin was used because I assumed thatthe router would have the login of “admin”. You can use username listsas well if you wish. -P passlist.txt specified a password dictionarynamed “passlist.txt” - make sure to have the -P include the capital P,otherwise you'll be specifying a password to try. 10.1.1.1 is therouters IP address, and telnet is the protocol we want to attack. Nowobviously we could tell it to attack that protocol on a different port,but we won't bother with that right now unless anyone else wants to seehow. My dictionary only included 4 words for the purpose of thistutorial. N now, you can get the cracked password....
It’s inevitable: if your computer is Internet-connected you will have people coming a-knockin’. Fortunately Linux users are more savvy than to think any keep-alive ping or other piece of Internet flotsam is a hack attempt.
Even so, it’s simply a matter of time before your router’s lights flash heavily and /var/log/auth.log (/var/log/secure on RedHat) fills with chilling messages like these:
$ tail /var/log/auth.log Aug 1 20:23:41 www.PCTipsbyAnu.tk sshd[15577]: (pam_unix) authentication failure; logname= uid=0 euid=0 tty=ssh ruser= rhost=61.218.125.178 Aug 1 20:23:44 www.PCTipsbyAnu.tk sshd[15577]: Failed password for invalid user edward from 210.48.230.5 port 43812 ssh2 Aug 1 20:23:46 www.PCTipsbyAnu.tk sshd[15581]: Invalid user javed from 210.48.230.5 Aug 1 20:23:46 www.PCTipsbyAnu.tk sshd[15581]: (pam_unix) check pass; user unknown Aug 1 20:23:46 www.PCTipsbyAnu.tk sshd[15581]: (pam_unix) authentication failure; logname= uid=0 euid=0 tty=ssh ruser= rhost=61.218.125.178 Aug 1 20:23:49 www.PCTipsbyAnu.tk sshd[15581]: Failed password for invalid user javed from 210.48.230.5 port 44088 ssh2 Aug 1 20:23:51 www.PCTipsbyAnu.tk sshd[15585]: Invalid user code from 210.48.230.5 Aug 1 20:23:51 www.PCTipsbyAnu.tk sshd[15585]: (pam_unix) check pass; user unknown Aug 1 20:23:51 www.PCTipsbyAnu.tk sshd[15585]: (pam_unix) authentication failure; logname= uid=0 euid=0 tty=ssh ruser= rhost=61.218.125.178 Aug 1 20:23:53 www.PCTipsbyAnu.tk sshd[15585]: Failed password for invalid user code from 210.48.230.5 port 44346 ssh2
The warnings are clear: someone is trying to log in via sshd, the secure shell daemon, trying random username and password combinations. And, as great as high-bandwidth is, the downside is that malicious forces can attempt thousands of login attempts in a very short time.
Now, the right term for a person who attempts to exploit security is a cracker, but “hacker” – rightfully an inquisitive and enthusiastic person – has been popularised as a malicious meddler. Nevertheless, at this point in time semantics are the last thing on your mind: whether you're being hacked or cracked you’ve got to secure your system and keep out the bad guys.
In fact, someone successfully logging in is only one of your worries. Firstly, each attempt adds several lines to your log files. In time, a lot of disk space is wasted and your logs become almost meaningless with other information you might be seeking being well hidden amongst the tens of thousands of repetitive entries.
And, more importantly, a high-speed multi-threaded attack runs the risk of denying your service by consuming all your bandwidth – let alone system resources. And if your system is too busy handling these connections, how will you log in, yourself?
So then - what do you do?
Lock down sshd The very first step is to beef up the security on SSH itself.
Firstly, you don’t want anyone logging in to your system as root. This gives unfettered power. This doesn’t stop you remoting in to your system using an ordinary user account and su’ing to root. Edit the /etc/ssh/sshd_config file and ensure it has an entry “PermitRootLogin no”. This means ssh will just prevent root logins; any attempt will fail even if the password is right. Best of all, the failure message gives no hint the connection failed because of this rule; it looks like any other bad username/password combo. This means your cracker has to guess a genuine username and password so their work is made much harder.
Depending on how flexible your network is, you might also consider changing the port number that SSH listens on. By default, it uses port 22 and this is the port crackers will be attempting to use. You could change this to some other arbitrary port. You will still be able to SSH in, specifying the appropriate port number, but others will have no success unless they realise firstly there’s another port open, and secondly that it is used for SSH (the fact a non-standard port is open gives no immediate information as to the protocol it uses.) Once again, edit /etc/ssh/sshd_config and set a customised port number on the ListenAddress line.
This is a good start. Yet, there’s still more to do. The biggest problem is there’s no built-in mechanism to stop repeated login attempts from the same IP address, even if it is failing continually.
Fortunately, all modern Linux distros come standard with a built-in firewall package known as netfilter/iptables. Netfilter is the framework that interacts with the kernel to inspect network packets; iptables is a firewall component which uses netfilter to filter packets based on specified rules. (Previously, the predominant package for this purpose was ipchains.)
Well and good, but unfortunately, iptables has no built-in rules to protect against brute force attacks. It’s installed, but it’s just sitting there idle.
Recently, CODE MOBILE faced this very problem. He solved his issue with two dead simple iptables rules that everyone can use. These are:
sudo iptables -A INPUT -i eth0 -p tcp --dport 22 -m state --state NEW -m recent --set --name SSH
sudo iptables -A INPUT -i eth0 -p tcp --dport 22 -m state --state NEW -m recent --update --seconds 60 --hitcount 8 --rttl --name SSH -j DROP
This pair of commands rate-limits all incoming SSH connections to eight per minute. A valid user who knows their username and password won’t be inconvenienced at all, but brute-force crackers will have their connection attempts – each being a try at a username and password – dropped right down to eight from the lofty number otherwise offered by high-speed data networks.
You can use iptables –L at any time to list your firewall rules and you can use iptables –F at any time to flush the rules. It’s definitely worthwhile checking Kevin’s blog for more detail on his rules, including how to make them take effect upon system boot.
iptables – Plan B
The rules above are clear and concise. The problem is they don’t really send a strong message to the cracker to go away. 2020Code strive for more protection with stricter iptables rules:
Firstly, a two-second pause is forced between successive SSH connections from the same host, slowing down login attempts.
Secondly, if the same host attempts (and fails) connection five times within the span of one minute, the host is automatically blacklisted.
Thirdly, this block lapses after a full hour passes with no connection attempts from the host.
This is much more industrial strength. Now the cracker only gets five chances every sixty-one minutes. They’ll soon move on to other grounds. The downside is fat-fingered legitimate users can potentially lock themselves out, and this is especially problematic if you have possibly many users from behind a NAT’d network who legitimately need to connect to your system and some of the users are slightly forgetful or password-challenged.
sshblack
You might prefer not to edit the iptables rules yourself. Or, you may want rules which exercise more intelligence so that genuine users, albeit absent-minded, aren’t locked out.
In this case, sshblack is a freely-downloaded Perl script that eases the burden. It actively monitors log files for any concerning activity and reacts to aggressive attacks by adding their IP address to a blacklist. Any host attempting a connection which is found in the blacklist is prevented from making an SSH connection. After a period of time, the host is removed from the blacklist. The script can send e-mail notices keeping you aware of any possible concerns.
The downsides to sshblack are that it hasn’t been updated since 2006, and also that it works by parsing log files. This means it doesn’t necessarily react instantaneously to cracking attempts depending on the processor’s load.
DenyHosts
We've saved the best to last. Now you know the problem and approaches to solving it, there’s another terrific option, the SourceForge project called DenyHosts, written in Python. Like all the above, the fundamental purpose is to thwart SSH attacks by blocking IP addresses which appear to be engaging in malicious behaviour. Where DenyHosts differs is that it isn’t running in isolation. The above solutions will reject hosts after they’ve already made failed attempts on your computer; by contrast DenyHosts uses a communal database to proactively protect your system. You need not even suffer one connection attempt by a host which has been detected as hostile by others.
DenyHosts is a snap to set up. Just install the RPM or unpack the tarball – both available for free download from SourceForge. Out of all the methods surveyed here, DenyHosts is the slickest and most elegant. Its one catch is that it is tied to the version of Python installed. This means you need to exercise caution whenever upgrading Python. Alternatively, you can install multiple versions of Python in different directories.
It’s not uncommon to have crackers survey your system. Sadly, it’s also not uncommon for people to overlook security options. The above techniques can make the difference on your computer and bolster your security and peace of mind.
What is brute forcing ? In layman language, brute forcing means using a tool that picks passwords from a word list and tries them one by one until one works.
How to make a word list ? A word list can consist of all possible combination's of letter,numbers,special characters. It can have some common or default passwords. You can download the word list generators or goggle the word-lists for brute-forcing and configure them according to yourself.
How fruitful attack can be ? If we are try all possible combination's of letter,numbers,special characters, theoretically chances of success are 100%. But practically it is not possible to try every combination because it can take a lot of time. This attack just depends on the time you give,processing power and of course your luck.
Step 2 (a) Make a usename wordlist consisting of some common usernames like this
(b) Get a wordlist of passwords (c) Copy both wordlists to your hydra folder
Step 3 (a)Open the command prompt and change directory to your hydra folder using cd command.
(b) Type "hydra" without quotes and it will show you the options to use.
(c) Now to start attak,
Type "hydra -L userslist.txt -P passlist.txt xxx.xxx.xxx.xxx ftp" and press enter
where userslist.txt is the list of usernames, passlist.txt is the list of passwords and xxx.xxx.xxx.xxx is the IP address of target, Now it will start cracking
To use a single username instead of wordlist , Replace capital L with small l , like this
Type "hydra -l username -P passlist.txt xxx.xxx.xxx.xxx ftp"
Note : Ftp port must be open.
Warning: I highly recommend you to use a chain of proxies to spoof your identity because proper logs of user's IP addresses who try to connect to ftp server is made on the server. Here is an example of the same.
Countermeasures to protect yourself from this attack: Use strong passwords
WinRAR has a feature that allows archive creators to lock an .rararchive or SFX executable (.exe) in order to protect the RAR packed orpackaged archive from modification and change. When the WinRAR archivelocked, everybody cannot change the content in the archive, be itfiles, folders, comments, SFX options and modules.
However, the protection of RAR archive or SFX executable is notfoolproof, as it can be easily unlocked, by just patching a few bytes.WinRAR Unlock is a small utility that does exactly that to unlockWinRAR archive (including SFX), effectively allowing anybody to modify,edit or change the content of archive freely. WinRAR Unlock is a freeware with no payment required. WinRAR Unlockcan be downloaded, installed and used for free without any cost. Noserial number, product key, registration code, crack, hack or keygenrequired to use the full version program.
RarCrack is a program that uses brute force algorithm to find andrecover the correct password for compressed archive in .rar (WinRAR),.7z (7-Zip) and .zip (WinZip) format in any POSIX compatible operatingsystem. As such, RarCrack is useful when you have forgotten or lost thepassword for the compressed archive package in the supported format. Tomake bruteforce password breaking faster, RarCrack supports specifyinga selection of characters and digits to be used in password generationsin order to crack the password.
The guide below is a brief explanation on how to use RarCrack torecover and retrieve back the password for .rar, .7z or .zip files.
Note that RarCrack requires glibc 2.4, pthreads and libxml2 librariesin order to work. Use rpm, pkg_add, apt-get and other commands toinstall the dependencies if it’s not installed yet.
Download RarCrack by using the one of the following commands (just the difference of downloading mirror) in terminal:wget http://superb-east.dl.sourceforge.net/sourceforge/rarcrack/rarcrack-0.2.tar.bz2 wget http://kent.dl.sourceforge.net/sourceforge/rarcrack/rarcrack-0.2.tar.bz2 wget http://nchc.dl.sourceforge.net/sourceforge/rarcrack/rarcrack-0.2.tar.bz2
Extract the RarCrack archive:
tar -xjf rarcrack-0.2.tar.bz2
Change directory into the extracted RarCrack folder:
cd rarcrack-0.2
Install the RarCrack with the following command:make sudo make install (so simply make install if already login as root)
To crack or break the RAR, 7z or ZIP file Password, use the following syntax:
The switch in [] is optional. RarCrack can autodetect the archivetype, so the –type parameter only require if auto-detection of filetype is wrong. And by default, RarCrack launches two cracking threadsif no thread number is specified. For example,
rarcrack example.rar rarcrack forgetpassword.zip
After starting the process to break and crack the password,RarCrack will print and save the current status of cracking to a XMLstatus file. Any valid good password to open the archive, if found,will be printed as good_password variable. An example of the XML fileis as follow:
Tip: If you can barely remember the password but pretty confidentthat only certain characters or digits are used, modify the “abc”character set to include those characters or numbers only. On firstuse, run the RarCrack to generate the XML status file, then edit thenfile and rerun the RarCrack again.
Ok guys, here is a simple n effective way to crack/unlock a locked hdd/harddisk
password. So lets check it out...
During development of the Rockbox firmware, on several occations the
harddisk has become locked, i.e. password protected. This results in
the Archos displaying:

Part. Error
Pls Chck HD

We are still not 100% sure why it happened. Theories range from
low-power conditions to accidental chip select failure. It has also
happened for normal users, using the standard Archos-supplied
firmware, although it was more frequent for us developers.

Note: None of us developers have experienced this problem since march 2002.

We do however know how to unlock the disk:

Windows/DOS unlock
Note: This requires taking the Archos apart, which will void your warranty!

Grab atapwd
Create a bootable DOS floppy disk, and put atapwd.exe on it
Remove the harddisk from your Archos and plug it into a laptop (or a
standard PC, using a 3.5" => 2.5" IDE adapter)
Boot from the floppy and run atapwd.exe
Select the locked harddrive and press enter for the menu
For Fujitsu disks: Choose "unlock with user password", then "disable
with user password". The password is empty, so just press enter at the
prompt.
For Toshiba and Hitachi disks, if the above doesn't work: Choose
"unlock with master password", then "disable with master password".
The password is all spaces.
Your disk is now unlocked. Shut down the computer and remove the disk.
Big thanks to Magnus Andersson for discovering the Fujitsu (lack of)
user password!

There is also a program for win32, ArchosUnlock.exe, that creates a
linux boot disk with the below mentioned patched isd200 driver.

Linux unlock
For those of us using Linux, we have written an isd200 driver patch.
This modified driver will automatically unlock
the disk when you connect your Archos via USB, so you don't have to do
anything special. Apply the patch to a 2.4.18 linux kernel tree.

Still locked?
If the above suggestions don't work, here's some background info about
the disk lock feature:

The disk lock is a built-in security feature in the disk. It is part
of the ATA specification, and thus not specific to any brand or
device.

A disk always has two passwords: A User password and a Master
password. Most disks support a Master Password Revision Code, which
can tell you if the Master password has been changed, or it it still
the factory default. The revision code is word 92 in the IDENTIFY
response. A value of 0xFFFE means the Master password is unchanged.

A disk can be locked in two modes: High security mode or Maximum
security mode. Bit 8 in word 128 of the IDENTIFY response tell you
which mode your disk is in: 0 = High, 1 = Maximum.

In High security mode, you can unlock the disk with either the user or
master password, using the "SECURITY UNLOCK DEVICE" ATA command. There
is an attempt limit, normally set to 5, after which you must power
cycle or hard-reset the disk before you can attempt again.

In Maximum security mode, you cannot unlock the disk! The only way to
get the disk back to a usable state is to issue the SECURITY ERASE
PREPARE command, immediately followed by SECURITY ERASE UNIT. The
SECURITY ERASE UNIT command requires the Master password and will
completely erase all data on the disk. The operation is rather slow,
expect half an hour or more for big disks. (Word 89 in the IDENTIFY
response indicates how long the operation will take.)
This tutorial is sended by our Guest Member <"Signal Sender"signalsender@gmail.com
If you want to do any MS Terminal Server cracking you basically haveyour choice of three tools that can do it for you; TSgrinder, TScrack,and a patched version of RDesktop. This article takes you step-by-step through the concepts, tools and usage.
Hacking Exposed Windows Server 2003 goes a great overview, I won’tplagiarize it all here, so check it out for me details and thereferences section of this paper for some MS references. Prior to Terminal Services, Windows did not provide the ability to runcode remotely in the processor space of the server. Another way to putthis is there was no way to have an “interactive” session on theserver. There were tools like wsremote or psexec or VNC. If an attackergot a non administrator level account on a remote machine they couldmap shares and copy files but had a difficult time running code on theserver. Now, with Terminal Services, an attacker can log on as a nonprivileged user and run exploit local exploit code via the TerminalServices GUI. These attacks used to be fairly limited to local physicalattacks or from users who actually logging into your domain but now ifthe server has Terminal Services (2000 server 2003 server) or RDP(Windows XP) running the attack vector increases. Terminal Services by default listen on port 3389 (but can be changed by editing the registry). If you want to change the listening port, edit this registry key: \HKLM\System\CurrentControlSet\Control\Terminal Server\WinStationRDP-TCP Value : PortNUmber REG_DWORD=3389 To turn on Terminal Server/RDP, edit this registry key (or to turn it on via command line): reg add "HKLM\SYSTEM\CurrentControlSet\Control\Terminal Server" /v fDenyTSConnections /t REG_DWORD /d 0 With this command you can enable the RDP Service.
Password Cracking Basics
There are three types of password attacks: Brute Force: A cryptanalysis technique or other kind of attackmethod involving an exhaustive procedure that tries all possibilities,one-by-one. [1] For example, the program might follow a sequence likethis: "aaaaaaaa" "aaaaaaab" "aaaaaaac" ... Until the password is found
Dictionary Attack: An attack that tries all of the phrases orwords in a dictionary, trying to crack a password or key. A dictionaryattack uses a predefined list of words compared to a brute force attackthat tries all possible combinations. [2]
Hybrid Attack: A hybrid attack is a mixture of a brute forceattach and a dictionary attack. There are many different ways a hybridattack can be performed, in it's simplest form a hybrid attack maysimply add a couple of numbers to the end of each dictionary wordtried, this increases the number of tested combinations without havingto resort to a true brute force attack. Cracking software will oftenuse a combination or selection of all three methods to try and guessyour password. [3]
Terminal Services Enumeration
You can google for “/TSWeb/default.htm” Figure 1.1: Output of a google search for /TSWeb/default.htm You can nmap for port 3389 Figure 1.2: A Nmap scan looking for port 3389 open on the Class C. Figure 1.3: Results on the Nmap Scan looking for open port 3389. You can use ProbeTS (http://www.ziddu.com/download/13010137/probets.zip.html): Figure 1.4: The output of probeTS.
Terminal Services Connections
Let’s see what a regular Terminal Services connection looks like. Figure 1.5: the Terminal Services/RDP Client on Windows 2000 Pro to a Windows 2000 Terminal Server. Figure 1.6: Issuing a command over the Terminal Services Client.
Part 2: TSGrinder
From the TSGrinder website: “TSGrinder is the first production Terminal Server bruteforce tool. Themain idea here is that the Administrator account, since it cannot belocked out for local logons, can be brute forced. Also having anencrypted channel to the TS logon process sure helps to keep IDS fromcatching the attempts. TSGrinder is a "dictionary" based attack tool, but it does have someinteresting features like "l337" conversion, and supports multipleattack windows from a single dictionary file. It supports multiplepassword attempts in the same connection, and allows you to specify howmany times to try a username/password combination within a particularconnection. Also, the problem you describe can be exacerbated in that administratoraccount can be brute-forced without creating a log entry, by attempting5 logons and disconnecting before Windows disconnects and logs afterthe sixth failure.” Let’s see TSGrinder in action. I had to use the Windows XP RDP clienton Windows2000 SP4 to get TSGrinder to work properly. I did not needroboclient.zip that it mentions on the website. Figure 2.1: TSGrinder being run with no arguments. Figure 2.2: TSGrinder using a dictionary attack against the administrator account. Figure 2.3: A failed attempt. Figure 2.4: if TSGrinder guesses the password it will log into the terminal services and immediately disconnect. Figure 2.5: A successful attempt with TSGrinder. Figure 2.6: TSGrinder supports 2 threads. Here you can see two threads running the attack. Figure 2.7: A successful attempt with TSGrinder that used 2 threads to run the attack.
Part 3: TScrack
From the TScrack documentation: “The Windows Terminal Services facility offers graphical desktopsessions to remote clients. Terminal Services enables users to work ina windows session that exists on the server. The client functionalityis basically reduced to the functionality of a terminal, all it does isdisplay the session screen, and collect user input. TScrack applies AI technology (Artificial Neural Networks) to scrapethe screen contents of the graphical logon, in order to enable a simpledictionary based cracking algorithm to perform efficiently against thegraphically presented logon dialogs and message boxes. This is very similar to the technology used i.e. in Optical CharacterRecognition (OCR), Face- and Image recognition in general. TScrack was written for two purposes: a) To provide a tool to assess password security of MS RDP servers b) As proof of concept code, to point out that graphical logons are byno means secure from automated cracking / password guessing tools Figure 3.1: TScrack being run with no arguments. Figure 3.2: TScrack being run against a Windows Server 2003 Terminal Server Figure 3.3: TScrack successfully cracking the password Figure 3.4: TScrack also does multithreading cracking, use the –t option for 2 connections Figure 3.5: TScrack with two simultaneous connections running Figure 3.6: TScrack successfully cracking the password TScrack was updated to v2.1 to include brute force attacks (something TSGrinder does not do). Figure 3.7: TScrack in Brute force mode (-B option & max word length of 6) **Note 1: I attempted to use the –N (no logging option). WindowsServer 2003 still logged every failed attempt to log on (which isgood). Figure 3.8: TScrack in Brute force mode with the –N (no logging) option Figure 3.9: Even with –N enabled Windows Server 2003 logged theattempts. I did not test every configuration on every type of OS, Ijust noticed it was logging the attempt and shared the info. **Note 2: I also had to drastically change the default password policyon Server 2003 to put an easy to crack password. I chose a password of“chrisg” as the password I wanted to brute force. Figure 3.10: Here is the default password policy for Windows Server 2003 Figure 3.11: What I changed the password policy to, to allow “chrisg” as a password **Note 3: I had to run TScrack 2.1 on windows 2000 machine; it wasn’tworking properly on Windows XP SP2. Also, If you are getting aMSRDP.OCX error, then uninstall TScrack using the “-U” option thenreinstalling by issuing TScrack.exe –h.
Part 4: Rdesktop & BruteForcing RDP with Rdesktop patch
Download rdesktop version 1.41 from the website: http://www.rdesktop.org/%20 http://prdownloads.sourceforge.net/rdesktop/rdesktop-1.4.1.tar.gz?download%20 Download the rdp-bruteforce patch from foofus.net: http://www.foofus.net/jmk/rdesktop.html%20 http://www.foofus.net/jmk/tools/rdp-brute-force-r422.diff%20 Paste the patch into the source directory and apply the patch SegFault:/Users/chrisgates/Desktop root# cd rdesktop-1.4.1 SegFault:/Users/chrisgates/Desktop/rdesktop-1.4.1 root# patch -p1 -i rdp-brute-force-r422.diff patching file orders.c patching file orders.h patching file rdesktop.c patching file rdesktop.h patching file rdp.c patching file secure.c patching file xkeymap.c compile and install rdesktop: ./configure make sudo make install Start X-Windows/X-Darwin/X11(I used X-Darwin installed using fink usingMac OS X Tiger). Shouldn’t be an issue if you are using an linux flavorwith a GUI. Now start Rdesktop with your passlist and user or userlist: SegFault:~/Desktop/rdesktop-1.4.1 chrisgates$ rdesktop -u administrator -p pass.txt 192.168.0.105 **you'll need to run this from X-Darwin/X-Windows/X-11, if you run it from the command line it will say something like: ERROR: Failed to open display: If everything is working right you'll see it opening the Rdesktoptrying to log in and then exiting. Check your command line output tosee if you were able to guess the password. Figure 4.1: Running Rdesktop with no parameters gives you the help menu. Figure 4.2: Issuing the command line parameters to start Rdestop in *nix in XDarwin. Figure 4.3: Rdestop brute forcing the accounts. The following output was against an XP Pro SP2 host. With XP if theuser is currently logged in, they will be forced to log off if youconnect to the machine over RDP. SegFault:~/Desktop/rdesktop-1.4.1 chrisgates$ rdesktop -u noone -p pass.txt 192.168.0.105 Starting dictionary attack against server 192.168.0.105 ------------------------------------------------------- Retrieved connection termination packet. Account credentials are NOT valid. Retrieved connection termination packet. [failure] User "noone" Password "test" Retrieved connection termination packet. Account credentials are NOT valid. Retrieved connection termination packet. ---SNIP--- [failure] User "noone" Password "admin" Retrieved connection termination packet. Account credentials are NOT valid. Retrieved connection termination packet. [failure] User "noone" Password "administrator" Valid credentials, however, another user is currently logged on. [success] User "noone" Password "noone" SegFault:~/Desktop/rdesktop-1.4.1 chrisgates$ Figure 4.4: The command line output of the successful attack against XP SP2 but with the user logged in. Let’s see Rdesktop against a Windows Server 2003. Figure 4.5: Rdesktop against Windows Server 2003 against the “chris” account. Figure 4.6: Rdesktop successfully cracking the password with a dictionary attack.
Hi friends, here is a trick to crack any version of WinRAR. I can't take all the credits of that post bcz this trick is supposed/innovated by my friend "Code Mobile" and implemented by me. You can crack any version of WinRAR using this methodand need not to pay for the registration fee and you can do this all byyour self,easily. Furthermore, major software are cracked using thesame way,but just get a bit complex in the methodology. This tutorialis intended for those who are new to cracking and disassembling.
REQUIREMENTS :- To perform this hack you will be needing -
Any De-assembler (I use Hackers Disassembler and Hview )
Resource Hacker
A patch Creator ( Use Universal Patch Creator or Code fusion)
How to Crack ? You need to have a bit knowledge of assembly language, and in case youdon't have it, just cram the steps and it will work anytime, every time.Download the latest version of WinRAR from their website and install it. I will be cracking Winrar 3.80 here (bcz I already have it:P ).
This is basically a 2 step process ( 4 step ,if you want to do things with a professional touch,period) .
Now copy the WinRAR.exe file to desktop. Make a copy of it there.
Step 1 – Hunting for Memory Address Now load Hackers Disasembler and load the copy in it.
The Disassembler will disassemble the executable in assembly code. Nowyou need to search for strings that are used in WinRAR program. PressCtrl + F and type “evaluation” without quotes and search in theassembly code. Hit enter..
After you have reached this block of code by searching, just look atthe block of code above it. There you will find that some assemblyvalues are being compared and then code is jumped to some otherfunction. Now see carefully, the “evaluation copy” function must beinvoked after some specific condition is met. We need to look for it atthe code and the make certain changes to the condition so that theprogram doesn't checks for the condition.
Thisis the code responsible for validating you as a legal user :) .
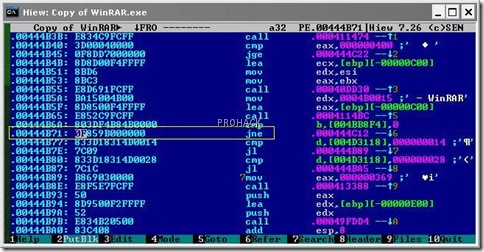
Justnote down the memory address that leads to jump (JNE) at some memorylocation. In this case, note down 00444B71 .
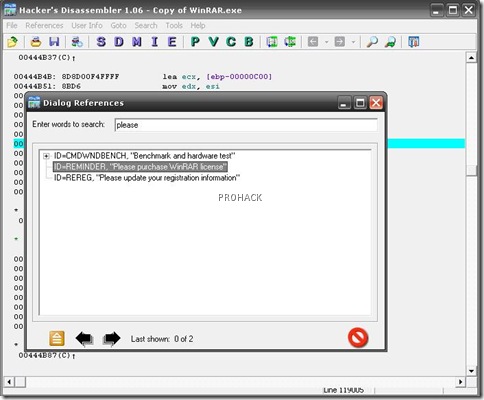
Note :Forany WinRAR version, this code and memory address might be different,butthe JNE will be same. Just note down the respective memory address thatchecks. Now you need to search for the code that brings that ugly nag screen“Please purchase WinRAR license” after your trial period of 40 days isover. For this,look over your toolbar and click on “D” which stands forlooking for Dialog references. Now in the dialog box that opens, search for “please” and you will get the reference as -
ID-REMINDER, “Please purchase WinRAR license”
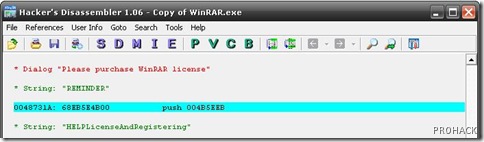
Double click on it and you will reach the subsequent code.
Just note the memory address that invokes the REMINDER dialog.
In this case its 0048731A. Note it down.
Note :Forany WinRAR version, this code and memory address might be different.Butthe Reminder Memory address code will always PUSH something. Just notedown the respective memory address that PUSH ‘s.
Step 2 – Fixing and Patching Now in this step we will be patching up values of memory addresses we noted earlier.
I will be doing this using HVIEW. Now load the copy you disassembled in Hacker’s Disassembler in Hview.
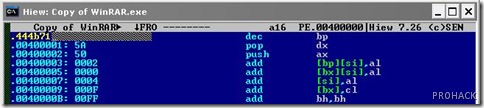
After you have loaded it, you will see the code is unreadable. Its justlike opening an EXE file in notepad. You need to decode it. To do that,just press F4 and yoiu will get an option to decode it. Hit DECODE andyou will be able to see code in the form of assembly code and memoryaddresses.
After you have done that, you need to search for memory addresses younoted down earlier. Just hit F5 and a search box will be there. Now youneed to enter the memory address.
To do that, enter a “.” and the typememory address neglecting the earlier “00” . The “.” will suffice for“00”. ie -
Type .444B71 in place of 00444B71
and search in the code.
After you have reached the respective code, you need to make changes toit. Press F3 and you will be able to edit the code.Now make thefollowing changes -
After you have done it, save it by pressing F9.
Now search for next memory location by pressing F5 and entering it. Reach there and make the following changes by pressing F3 -
Save the changes by pressing F9 and exit HVIEW by pressing F10.
Congrats..
You have cracked WinRAR :) Replace the original WinRAR.exewith this copyofwinrar.exe by renaming it. It will work 100% fine :P
Step 3 – Spicing up the EXE Now U have a 100% working version of EXE, you might want to change yourregistration information in WinRAR. TO do this, you can use Resourcehacker.
Launch Resource Hacker, load the copyofwinrar.exe in it
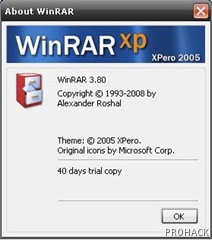
Now go to DIALOG – Expand tree – ABOUTRARDLG and click it. NowFind Trial copy line and replace it with your favorite one :P
and click on Compile Script button.
Now save the file with any name on your desktop or any location what so ever.
Now you have a fully patched WinRAR.exe file :)) you can either use it,or also can distribute it like a real cracker. If you want to learnthat, move on to next step.
Step 4 – Creating a working Patch (or giving Professional touch :P ) I will be using Universal Patcher (UPE) for creating thepatch. The patch will work like any authentic one for that WinRARversion. Just like the one U downloaded at anytime of your life fromany Crack and Keygen website. Launch Patch Creator and click on add new project. Enter project Information and click on save.
Click on Add – ; Offset patch
After you have done that, double click on offset patch and then
Give path of original winrar.exe
Give path of unmodified Winrar.exe (again)
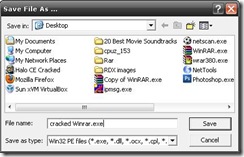
Give path for fully patched Winrar.exe (ie Cracked Winrar.exe in this case)
Click on compare and it will show difference between both files
Click on save.
Now in the next window, click on Create Patch and save it. The Patchwill be created. Now copy it in WinRAR installation directory and hiton patch, it WILL work.
Congrats you have created a patch of your own and have learned to crack WinRAR :)
You can crack other software in the same way…just practice,debug and disassemble and you will get the way


 Tuesday, December 27, 2011
 Anu
Anu